Tuesday, June 30, 2009

Letter Hair "T"

The baby Mermaid wanted Letter Hair! don't ask me why the inner workings of a 7 year olds brain is something I will never understand! So for some strange reason we decided on the letter "T" I started with dry hair and parted out the front like this. It will end up being the top of the "T" Then I had her face me and put her head down (look at the floor) while I started at the bottom and braided up to the part


Here it is braided up to the top

Then I split the pony that is the stem of the "T" and braided that into the top of the "T" I wish I would have pulled this a little bit tighter! she kind of had a bump on the top that I was not in love with but I guess it is all trial and error when you are braiding a T on someones head!

Here is the "T" from the top
Here is the bottom part of the T and her little pigs hanging down, I tried to talk her into braids all the way down but she knows what she wants!
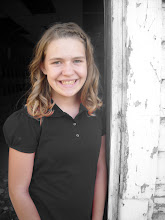
Here is baby mermaid from the front

Saturday, June 27, 2009

puffy pigtails with braids

Second day puffy pigtails, Little princess hair still looked pretty good so we thought that we would spice it up a bit, we parted the hair down the middle to make pig tails and then sectioned off the front 2 pieces so this made 2 little pigtails, then I sectioned off a little piece of the pigtails and braided them back, crossed them and hooked them into the next pigtail, Here is a pic of me hooking the second braid across, OH and thanks Baby mermaid for our great photography!

Here are my next braided sections you can see how I pulled out little bits for the braids
Here is the second cross, made the same way as the first
Then I braided out the bottoms and tada you are done!
from the front

Puffy pig tails

Here is a fun easy swim hairdo.. or just a quick before school do, I am sure you have seen it everywhere but it is a staple at our house. We are using the little princess as our model today!
I parted the hair from the ears forward and then split that into pigtails! I used black elastics today so it would blend with her hair


Then I took a middle section and hooked the top into the elastic and then I put all the hair into a low pigtail

Then Just repeat on the other side

And then you have one silly princess!


Thursday, June 25, 2009

ladder pigtails


This is a "ladder in the back pigtails" Baby mermaid was my model and I had seen a girl at
wal-mart with hair kinda like this and so I thought I would put my spin on it and try it out! I parted out the bottom section and pulled it into a elastic on the left side
Then I parted out the next section and pulled it into an elastic on the right side!

now when I did the third section on the left side I pulled the bottom pigtail into it and the fourth section on the right side I pulled the second section into it

I hope her head is tilted and my parts were not that messy! (gasp)


Then I pulled the top into two pigtails and hooked the ladders into it!

It really was an easy do and here it is with bows of course! these bows are just newly listed on my Etsy site http://www.etsy.com/view_listing.php?listing_id=26978746 check them out if you want!

Monday, June 22, 2009

funky summer pigtail bun

To Cool for Hair had to speak in church on Fathers day and she wanted me to do her hair! so I had to take advantage and do something special, yet grown up! so we took a square part on the top and then parted the rest into pigtails set fairly low in the back behind her ears. ( we didn't want the princess Lea look)

Then I parted the square diagonally and dutch french braided the sections.


Hear it is finished braiding, I wish I would have pulled both braids to one side but we pulled one to each pony and fastened with an elastic

Like So

Here we are putting in the funky bun, unlike the other buns I do where I wrap the hair all the way around my fingers, this one I just wrap the middle around my fingers once! then a pull the loop up and bobby pin it to her head.

Here is a pic of me putting in lots of bobby pins! Her hair is so straight and thick that I have to use tons of pins or they just pop out! I told her we should staple them to her scalp... Maybe that's why she doesn't like me to do her hair LOL
This is what makes it messy and funky is the tails sticking out every which way


here is one side after I got all the pin curls in


Back view before I curled it


And the back view


here she is from the front,


Little rolled knots headband (day 2)

So yesterday we did the little rolled knots into piggies http://chic-clipshair.blogspot.com/2009/06/little-rolled-knots-into-pigtails.html and today I was lazy and the knots still looked ok so this is what we did, we sprayed her hair with detangler to get rid of the pigtail bumps, then pulled the knots tails like this and put elastics on them to hold them together Then we pulled the tails down under her hair and elasticed (my family says their is no such word as elasticed so I guess i should say I put an elastic in) it their tight!

combed out the rest of her hair and now she can go play with no hair in her face all day!


Zig-Zag French Braid

Today we thought that we would show you some of our favorite hairdos


Little princess wanted to keep her hair up off her neck today so we parted her hair in a zig-zag part with the long part of a rat tail comb, then we put one side in a elastic to keep it out of the way!Then we did a dutch french braid down one side
Then down the other side


We left fairly long tails of hair so we can do fantails.


Tuck them up with a second elastic


and voila, your done after adding bows of course!


* for your info! Sally hair supply has a sale on hair elastics 250 elastics for 50 cents till the end of June! I stocked up!


Thursday, June 18, 2009

little rolled knots into pigtails

We did this hairdo for the day, I have to admit I was sick of braids but who can just do pigtails and leave it alone? not me, We wore this to the library and got so many complements! thanks everyone! K here I parted out her hair into pigtails but I left out a long rectangle across the top


Pulled the hair into lower pigtails, they are not all the way down by her ears.


Next I rubbed pomade into her hair (just the rectangle)
Then I sectioned out a piece of hair and split it in half,


twisted each side toward each other. this makes it easier for me to tie the knot


Then cross it just like you would to start tying your shoes


This is where it differs from your standard shoe tie knot, instead of tucking it under once, tuck it under twice


Then pull it tight, as you can see they loosen up a little bit when you let go


Here are all of my knots done and I have tightened them up just a little bit, by holding them out like that then i hooked all of those ends into the pigtail with a second elastic!


From the back!


From the front


and from the top. (don't mind the bows! I cant believe that I don't have bows to match this shirt! I guess I need to get to work, and stop doing hair)